Using the Gutenberg block editor in WordPress, it’s easy to build content using the blocks. You can just click on the blocks to bring the functionality into your site. But what if you need a custom block for your specific needs? In this tutorial, we’ll create a Custom Notice Block, which will allow users to add and style notices in their WordPress posts or pages.
Step 1: Register the Custom Block
Follow the steps below ythat that registers the custom Gutenberg block.
- Navigate to your WordPress installation directory.
- Go to wp-content/plugins/ and create a new folder named custom-notice-block.
- Inside this folder, create a file named custom-notice-block.php and add the following code:
<?php
/**
 * Plugin Name: Custom Notice Block
 * Plugin URI: https://example.com
 * Description: A custom Gutenberg block for displaying notices.
 * Author: Your Name
 * Version: 1.0.0
 * License: GPL2+
 */

function ts_enqueue_notice_block() {
    wp_enqueue_script(
        'custom-notice-block',
        plugin_dir_url(__FILE__) . 'block.js',
        array('wp-blocks', 'wp-editor', 'wp-components', 'wp-element'),
        filemtime(plugin_dir_path(__FILE__) . 'block.js')
    );
}
add_action('enqueue_block_editor_assets', 'ts_enqueue_notice_block');
Step 2: Create the Block JavaScript File
Next, create a block.js file inside the custom-notice-block folder and add the following JavaScript code:
( function( blocks, editor, components, element ) {
    const { registerBlockType } = blocks;
    const { RichText, InspectorControls, PanelColorSettings } = editor;
    const { PanelBody, SelectControl } = components;
    const { createElement: el } = element;

    registerBlockType('custom/notice-box', {
        title: 'Notice Box',
        icon: 'info',
        category: 'common',

        attributes: {
            message: { type: 'string', source: 'html', selector: 'p' },
            noticeType: { type: 'string', default: 'info' },
            bgColor: { type: 'string', default: '#d8ebff' },
            textColor: { type: 'string', default: '#333333' }
        },

        edit: function(props) {
            const { attributes, setAttributes } = props;

            return el("div", {},
                el(InspectorControls, {},
                    el(PanelBody, { title: "Notice Settings" },
                        el(SelectControl, {
                            label: "Notice Type",
                            value: attributes.noticeType,
                            options: [
                                { label: 'Info', value: 'info' },
                                { label: 'Success', value: 'success' },
                                { label: 'Warning', value: 'warning' },
                                { label: 'Error', value: 'error' }
                            ],
                            onChange: (newType) => setAttributes({ noticeType: newType })
                        })
                    ),
                    el(PanelColorSettings, {
                        title: "Colors",
                        colorSettings: [
                            {
                                value: attributes.bgColor,
                                onChange: (newColor) => setAttributes({ bgColor: newColor }),
                                label: "Background Color"
                            },
                            {
                                value: attributes.textColor,
                                onChange: (newColor) => setAttributes({ textColor: newColor }),
                                label: "Text Color"
                            }
                        ]
                    })
                ),
                el("div", {
                    style: {
                        padding: "15px",
                        backgroundColor: attributes.bgColor,
                        color: attributes.textColor,
                        borderLeft: `5px solid ${getBorderColor(attributes.noticeType)}`,
                        borderRadius: "5px"
                    }
                },
                    el(RichText, {
                        tagName: "p",
                        value: attributes.message,
                        onChange: (newMessage) => setAttributes({ message: newMessage }),
                        placeholder: "Write your notice..."
                    })
                )
            );
        },

        save: function(props) {
            const { attributes } = props;
            return el("div", {
                style: {
                    padding: "15px",
                    backgroundColor: attributes.bgColor,
                    color: attributes.textColor,
                    borderLeft: `5px solid ${getBorderColor(attributes.noticeType)}`,
                    borderRadius: "5px"
                }
            },
                el("p", {}, attributes.message)
            );
        }
    });

    function getBorderColor(type) {
        switch (type) {
            case 'success': return '#28a745';
            case 'warning': return '#ffc107';
            case 'error': return '#dc3545';
            default: return '#4a90e2';
        }
    }

} )( window.wp.blocks, window.wp.editor, window.wp.components, window.wp.element );
Step 3: Activate the Plugin
Now that we have both custom-notice-block.php and block.js in place:
- Locate Custom Notice Block plugin and activate it.
- Go to WordPress Dashboard > Plugins.
Step 4: Use the Custom Block
- Open a post or page in the WordPress editor.
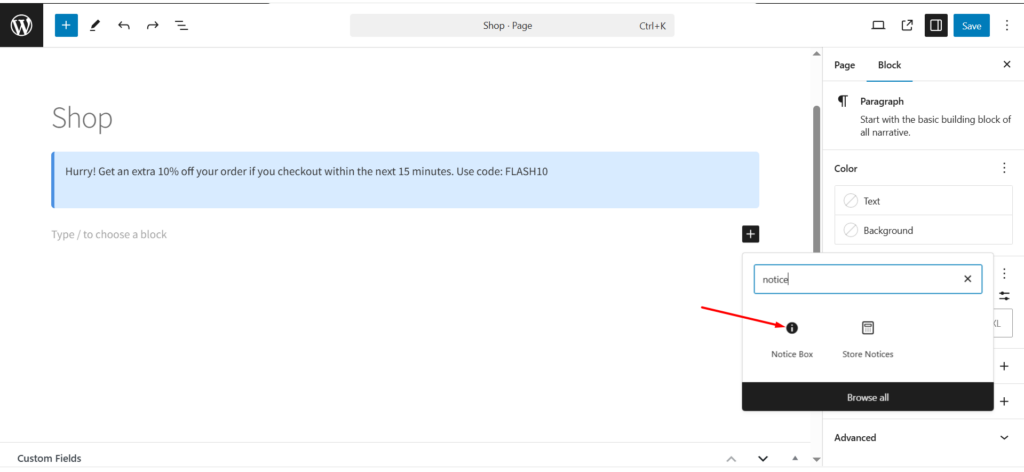
- Click Add Block (+) and search for
Notice Box. - Add the notice block with a message or any notice type.
- Save and preview the post to see the custom notice block in action!

